Monday, February 28, 2011

Some Grand Old Flags

Our venue, a home built in 1797, is understandably particular about sendoffs at their weddings.  Fireworks are prohibited because they're a historic site, so we agreed not to use sparklers.  We're not allowed to use anything that would involve a lot of clean up, like confetti.  After ruling out some of these other sendoff options, we began to consider what would work.  We needed something bright, colorful, and obviously whimsical.  Something like...

Flags!  I especially like the ones that have joyful words printed on them.

Ms. Potato Chip and Mrs. Pretzel have blogged about making these, and I decided to go the DIY route myself.

Materials
  • Colorful construction paper (about $3)
  • 1/4" dowels ($2 for a pack of 20)
  • Tape and/or a glue gun
  • Printer
  • Paper cutter
Instructions
 
I used the fonts that have now appeared on all of our wedding paper projects, Monterey BT and Ecuyer DAX.  I wrote in large font (think 6ish per page) "Yay!" and "Oh happy day!"  I felt like we needed something that was a little more us, so I also included "Woot!" and "¡Viva amor!"  Make sure that you have your text align right so that you'll have room to attach the left side to the dowel.  Then, I printed these onto construction paper.

Next, I sliced up the paper.

Here's where it gets interesting.  Mr. Lion and I disagreed on how to attach the paper flags to the dowels.  I opted to use my trusty glue gun, while Mr. Lion wanted to use tape.

Option #1: Tape
The tape required a bit more skill to make sure the paper flag was adequately attached so that it wouldn't slide down the "flagpole."

...however, it did leave room for error.  If Mr. Lion we messed up somehow, we were able to peel the tape off and start over.

Option #2: Glue Gun
This way definitely didn't require as much finesse.  I found it helpful to use the pointy tip (technical term, of course) attachment.

I squirted a little bit of glue on the dowel, then rolled the edge of the flag around it.  Then, I used a little more glue around the edge of the rolled paper, then rolled a little more to secure it.

Next, make sure you have a dance part and wave a flag around when a good song comes on your Pandora.

Total cost was about $17.  Total time spent?  Welllll, let's just say this is the kind of project you should do over several days with several good movies on in the background.  It can get a little time consuming!
{all personal photos, unless otherwise noted}

Lion Corgi approves!  What are you doing for your sendoff?

Friday, February 25, 2011

Gratitude & Grits

Though not as exclusive to the region as the groom's cake, it is a Southern tradition to thank your bridesmaids with a luncheon.  This is usually held the morning of the wedding, or during the afternoon the day before.  Unfortunately, our wedding is at 11am, so this ruled out "morning of."  Our rehearsal will be at 5pm the day before, so that made it a little too tight to squeeze in during the afternoon.  This lead me to my favorite meal of the day, brunch!
Some of my favorite places to brunch in Atlanta: Feast, Einstein's, Parish, Murphy's, and Ria's Bluebird

Sure, there are a lot of great brunch places around here.  You'd think it'd be tough to choose between all of these delicious locations, but it wasn't.  I wanted my bridesmaids to feel celebrated.  They've done so much for me, and many of them are traveling from out of state to stand by me on our wedding day.  I wanted delicious, casual food with a bright, colorful, fun backdrop.  I looked no further than the Flying Biscuit.

The Flying Biscuit is an Atlanta tradition.  It began in Midtown, as a simple biscuit shop.  They now have several locations throughout Atlanta, and even a few in North Carolina and Florida.  They serve a lot more than biscuits now, too.  Think Southern food with a twist.  Oh, there's grits and bacon, but they also offer chicken sausage, whole grain pancakes, and omelets with arugula and goat cheese.  They haven't forgotten their roots though; the biscuits are still the most popular item on the menu.

If you're wondering what that sauce is that's served with the biscuits, it's some kind of apple butter.  I don't know how to describe it other than "it tastes like Christmas."

I love the ambiance in the restaurant, too.  The mismatched tablecloths, handmade tabletop decor, and eclectic wall art are sure to convey a sense of fun as I thank my girls for all of their hard work.


If the weather is nice, we can even sit out on the patio, which is Lion Corgi friendly!

Are you throwing a luncheon for your bridesmaids?  Where did you choose to do it?

Wednesday, February 23, 2011

Getting Two Vacations Out of One Event

Mr. Lion and I really wanted to go to the Alps for our honeymoon, but it just wasn't in the cards this year.  After graduating from grad school and law school, starting our first grown-up jobs, and paying for most of our wedding, there was no way we could afford the trip, or the time off for such a long trip.  We decided to put it off, but for how long?  Going to Europe during the summer can be really expensive because it's tourist season.  Munich during the fall would be really crowded due to Oktoberfest, and there was no way Mr. Lion was going anywhere colder than Atlanta during the winter.  So, we decided to go next spring, for our one year anniversary.

We solved that problem, but we still didn't have a clue as to what we were doing for our honeymoon.  Then it hit us: why don't we just do a second, smaller trip?  Lots of Bees have blogged about the concept of a Minimoon, and we decided to jump on that bandwagon.

We wanted to go somewhere within driving distance, so we narrowed it down to Savannah, Charleston, and Asheville.  Savannah and Charleston, though both awesome destinations, are beach towns.  Mr. Lion and I are both Floridians, so we wanted to try to avoid sealevel and try something a little different.  Thus, we decided on Asheville.

We started shopping around for bed and breakfast inns.  You'd think we'd prioritize logical things like location and price, but no.  We looked at two factors: food, and whether or not it was pet-friendly.  What!  How cute would it be to bring Lion Corgi hiking with us?
Granted, those are probably the Rockies and that is not our dog; but I imagine it would look something like that.

We decided on the Black Walnut Inn.  The menu looked delicious, and they had pet-friendly cottages.  Look how pretty!

We're spending our wedding night here in Atlanta, then we're going to drive to North Carolina and spend two more nights at the B&B before returning to work.  I'm glad we get to take a small vacation, but it doesn't leave a lot of time to explore!  We found a great food tour and a brewery tour that sounded like fun, but neither are offered on the days we plan to be there.  We could always do Biltmore...

...but we'll probably just spend our short vacation enjoying the Blue Ridge mountains during beautiful springtime!

Do any of you have any fabulous Asheville recommendations for us?

Monday, February 21, 2011

Rawr: An Update

I recently had my first wedding dress fitting...with a seamstress who was just not my favorite person I've encountered along this wedding journey.  Y'all left me lots of comments (Yay!  I love comments) suggesting what I should do from there, explaining where the seamstress was coming from, but most of all, empathizing with me and telling me it would be okay (seriously Hive, be more awesome).  I left with a tinge of anxiety, worried that the top of the dress would still not fit me adequately.  I scheduled my next fitting six weeks later, which was also six weeks before the wedding.  I figured this would give me ample time to go elsewhere if the neckline was still gaping.

Hang on, gotta interrupt this story for a minute.

Now then, where were me?  Oh, yes.  I have since gone to said fitting.  I was a little nervous going in.  I left work a little early to get to the other side of Atlanta in time for my appointment, but I was lucky enough to run into two accidents.  I'm sure any of you Atlanta Bees can relate; driving across town from 4:00-5:30 on a Friday is not the brightest idea.  I called to say that I may be a little late, only to hear this response, "If you're not here at exactly 5:30, you need to reschedule."  Um, really?  This didn't help with the butterflies in my stomach.  Fortunately, I drive more like my Bostonian side than my Southern side, and I made it in time.  I met up with Lioness Bmaid Emily, who gave me a very supportive pep talk as we went in to face certain doom.
Sorry, Lioness Bmaid Emily!  If Ariel had some hot friends, I'd use that screencap.  But in order to illustrate this point, you've gotta be Sebastian.  Love you!

I slipped on the dress, zipped it up, and stared at the mirror in disbelief.  It was perfect.  Absolutely no gaping, even while jumping up and down.  I know, because I checked.  It wasn't really loose anywhere, but it wasn't uncomfortably tight either.  And the bustle, oh the bustle.  So much love.  We were so excited that we didn't really take pictures (Bad blogger!), but Lioness Bmaid Emily did manage to capture this shot of the bustle with her iPhone:

So, all was well in the end.  What wedding drama magically resolved for you?

Friday, February 18, 2011

A Whimsical Window

A few months ago, Mr. Lion and I went out to dinner for our last date-iversary.  After dinner, we decided to go for a little walk through the Virginia Highlands, one of my favorite areas in Atlanta.  One house that we walked by had a significant amount of trash on the curb...not garbage-trash, like we're-remodeling trash.  Among this trash was an old, rustic window.  I immediately thought of Mrs. Husky's post and the inspiration was instant.

We had planned on designing and printing programs, so we decided not to use the window for that.  However, we didn't plan on having ushers, so we could use the window for seating!  Here's the design I came up with:
Now, here's the part where I get in a little over my head.  The window is 37" x 34".  I wanted this text to fill the window.  I assumed the best way to paint the text on the window was to print and trace.  Now, maybe some of you design kids out there could have shown me an easy way to get this scaled just right, but my computer-illiterate self decided to muddle through it on my own.  What!  Mr. Lion was out of town for his bachelor party!  I had nothing better to do!

I used Keynote to design a slide, since that's what I've used to make research posters for presentations.  I opened the Inspector tab to edit the size of the slide.  In Keynote, one inch equals 72 pixels, so I did the math and created a 2664 x 2448 slide.  Then, I created a very large text block.  I mean, VERY large.  The line with "seat" was font size 400!  Then, I found a free program called PosteRazor that "tiled" images, like this:

The program then saved several 8 1/2 x 11" pdf files like this:

I cleaned the window thoroughly and got to printing.  I taped the pages, text side up, on the back of the window and traced over with a paintbrush.  This part was much more in my comfort zone than "tiling!"
 All taped up and ready to paint!


Total cost of this project?  About $2 in paint!  Totally worth stepping out of my comfort zone!  What DIY projects have taken you out of your comfort zone?

Thursday, February 17, 2011

One Last Invitation Reveal

We're having a traditional Cuban pig roast, called a caja china, for our rehearsal dinner.  The decor of the restaurant is bright and tropical, mostly with shades of red and turquoise.

When we designed the invitations for our rehearsal dinner, we wanted to incorporate this tropical color scheme, but we also wanted it to go along with our invitation suite.  It seemed like a stretch, but then we found one element that could carry over.

The carving on the tree!  Now, how could we make an oak tree tropical?  By turning it into a palm tree of course!  Without further ado, here is our rehearsal dinner postcard invitation:

Does your rehearsal dinner have the same theme as your wedding?  If not, did you carry over some elements from your wedding into your rehearsal dinner?

Monday, February 14, 2011

Freeking Charming

A while ago, I posted about finding a unique way to memorialize my cousin Mark at our wedding.  I decided to create bouquet charms using the logo for Freekware, Mark's clothing company.  To me, Freekware symbolizes positivity and love, themes that we definitely want incorporated into our wedding day!

I recently sat down with my glass pendant kit by Annie Howes and put together my bouquet charms.
Ah, a personalized note and some candy.  Love me some Etsy sellers!

One of the greatest things about Annie Howes' kits is that she includes tutorials on her website.  I printed out some Freekware logos and followed the tutorial step by step.

First, I covered the textured side of the glass tile with glaze, which was included in the kit.

I flipped the tile over and pressed down firmly to eliminate air bubbles.  Then, I waited for them to dry.

Once dry, I used crafting scissors and cuticle trimmers to separate each tile.  I applied a coat of glaze to the back of the charm.  Then, I attached the hardware onto the tile with the included glue.

Then, I had my finished product!
{all personal photos}

I have to say, this was probably my favorite DIY project thus far.  It was so nice to think about each of my bridesmaids walking down the aisle with this charm attached to their bouquets.  The sentiment behind it was in my mind during the entire time I was making the charms, and that left a smile on my face.

Are you making something to memorialize loved ones at your wedding?

Friday, February 11, 2011

The Guests Get Creative

Obviously, our wedding has a bit of a whimsical theme interlaced throughout the vintage and Southern and garden decor.  We tried to get the guests on board with the whimsy with a little message in our invitations.  You see, the bottom of the response card read, "Please use the reverse side of this card to provide marriage advice, whimsical doodles, flattering caricatures and/or well wishes!"  The back of the card was blank.  We have now received about a third of our RSVPs, and the entertainment only continues!

We received a special response card in the mail today...from none other than Sister Lioness, who designed the invitations in the first place!  Sister Lioness lives in NYC, and her boyfriend lives in Florida.  I sent one invitation addressed to both of them, and Sister Lioness informed me that they planned to open it "together" via Skype.

Their response card included a YouTube link, so I'll let the video do the talking from here.  You really should watch the whole thing because they are hilaaarious.  But, if you only have a couple of minutes, skip to about 7:25.  That's when you can really start to see the wheels turning inside Sister Lioness' head!


They weren't kidding, either:

That reminds me, Lioness guests.  The other 2/3 of you?  Yeah, you've got two more weeks to get those RSVPs in!  So, yeah!

We'll have to do something fun with the backs of these cards, but what?  Any ideas?

Wednesday, February 9, 2011

Candy & Cupcakes

First, let me begin with an update on our cake situation.  Y'all are AMAZING and I LOVED reading through all of your ideas and advice!  We decided on the family-style option.  We're going to have our servers bring platters to each table of eight.  Each platter will include two cupcakes of each of the three flavors, as well as two slices of groom's cake.  This way, there is one serving per guest (that is, I'm not buying 300 pieces of cake for 150 people!) but people still have options.

Until the cupcakes and groom's cake are served, they will be situated on a little table in the ballroom.  I plan to arrange the cupcakes on a tree like this:

The top tier of the tree will actually be a small cake (in one of our cupcake flavors) that we'll cut.  Instead of cake toppers, we'll be topping each cupcake with one small pinwheel.
 Created by Twirlie Whirlies

By the way, I am so glad I bought those pinwheels instead of trying to make them!  The thought of making 150 of them...eeek!  We assigned a different color combination to each flavor of cupcake, so we thought it would be a good idea to include a little key or legend for our guests.  We also wanted to include our Knightro-shaped groom's cake in the legend.  I threw this thing together on Pages, printed it on card stock, and placed it inside one of two 8x10 frames that I found at an antique store.
Lion Corgi approves!

We also ordered larger matching pinwheels to decorate our candy buffet, which we plan to fill with green and pool blue candy.

I made a little banner for the candy buffet out of baker's twine and card stock that reads "Love is Sweet."  Maybe we'll drape that between two larger pinwheels?

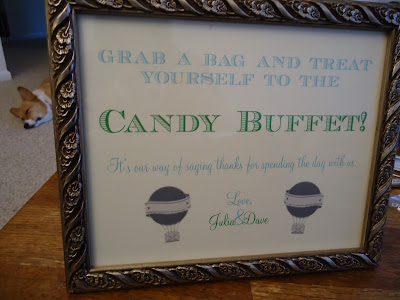
I filled the other frame with this sign that I made:
Lion Corgi is now taking a boredom nap.

Keeping consistent with our balloon motif, I made these little stickers to seal the bags our guests will fill with candy:

I feel like the pinwheels and signage carrying from the cake table to the candy buffet will help pull the theme together.  What did you do to make your reception theme come together?